Editing Plan Settings
If you have Edit access to an account plan, you can edit its basic configuration on the Plan Settings pages.
These pages are very similar to the pages of the Plan Setup wizard when you're creating a new account plan.
- Click the Settings button in the top right.
- Plan Settings is organized into several pages. The tabs enable you to navigate between these.
- Plan Type
- Status
- Click Add Member.
- Enter some or all of the person's name and/or title, and click Search. (Or just click Search to get a list of all users.)
- The users who match the search criteria are listed. Select the user(s) you want to add to the team.
- Click Add.
- The selected users are added to the team. In the Plan Access column, select an access level for each team member. One team member must be the Plan Owner.
- Select the Chatter group to which you want team updates to be automatically posted. If necessary, you can Create New Chatter Group.
- Click Add Accounts.
-
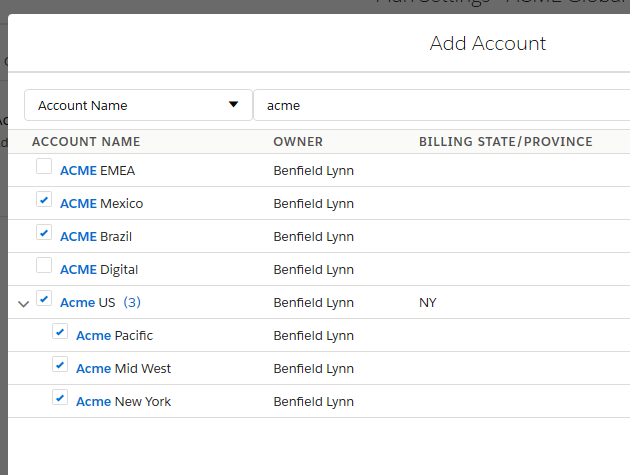
On the Add Account dialog, you can search by Account Name or account Owner. Type your search text.
-
Select the accounts you want to add to the plan.
A number in blue text, (3) on the Acme US row in the example above, indicates the number of child accounts an account has in the Salesforce hierarchy. If a child account is not selected, its opportunities are still displayed on the row for the parent account.
If a parent and its child account are selected, a row is displayed for each selected account, and an additional row displays the total opportunity amounts for parent and children.
- Click Add Accounts.
- To mark an account for particular focus, click its Target icon.
- Drag solutions and/or solution families across to the right-hand pane.
- In the right-hand pane, drag the solutions into the order in which you want them to be shown on the opportunity map.
- If you want to remove any solutions from the list, simply drag them back to the left-hand pane.
- To mark a solution for particular focus, click its Target icon.
- Click Add Period.
- Set the Start and End dates for the period.
-
Specify the revenue target for the period.
Note: For multicurrency orgs, this value is denominated in the corporate currency or your user currency - depending on how the administrator has configured Altify Account Manager.
- Repeat these steps for each period.
-
When you're done on this page, click another tab or Save & Close.
- Click Delete Account Plan on this page.
- Click Yes, Delete Account Plan to confirm that you want to go ahead with the deletion.
![]()
This is where you specify the plan's name and the following essential details:
The plan type determines the structure and some of the contents of the account plan.
Changing the plan type affects these aspects of the plan, but you can always switch back to the original plan type without losing any data.
An Active plan is one in which team members with Edit access can do work.
An Inactive plan is not editable, except for the Status field. This means a user with Edit access can always make the plan Active again.
When you're done on this page, click another tab or Save & Close.
This is where you specify who is on the account plan team ‑ the people who will collaborate with you.
To add a team member:
Select Automatically post... if you want a summary of activity on the account plan to be posted to the Chatter group each month.
Note: You only get Chatter options if Chatter is enabled in the org.
To remove a member from the team:
Click the team member's trashcan icon. (This does not delete the User record in Salesforce.)
Note: You can't remove the Plan Owner or yourself from the team.
When you're done on this page, click another tab or Save & Close.
This is where you add accounts to the plan – "where you are selling to". Each selected account is allocated a row on the opportunity map.
If the accounts have a hierarchical relationship in Salesforce, this is reflected on the opportunity map. (The software supports up to three levels.)
Adding accounts
Rearranging the accounts
The order in which the accounts are arranged in the Account Structure determines their order on the opportunity map.
To change the order of the accounts, drag them to their desired positions.
You can't drag an account to a different parent.
Removing an account
To remove an account, click its trashcan icon.
Editing Account Structure
Apart from the automatically grouped opportunities of parent and child accounts inherited from the Salesforce hierarchy, you can also manually group opportunities from different accounts under one account (and thereby display the opportunities on a single row of the opportunity map). In addition, the Altify Account Grouping Editor enables you to create account divisions to represent an account's buying structure.
To access the editor, click the Edit Structure button on the relevant row. For more information, see Manual Account Grouping and Creating Account Divisions.
This is where you specify 'what you sell': the plan's solutions. On the opportunity map, each solution is a column.
The available solutions are listed in the left-hand pane. You add them to the plan by dragging them to the right, where you can arrange them into the order you want them to be shown in on the opportunity map.
If the plan type has any default solutions, these are automatically added to the right-hand pane.
(The order in which the solutions are shown on the left has no effect on the opportunity map.)
If you drag across an individual solution that belongs to a solution family, it is presented within its solution family in the right-hand pane, and on the opportunity map.
Note: A solution can include 'tooltip' text. Hover over the info (i) icon to see this text. (The tooltip is also available in the opportunity map.)
This is where you add plan periods and revenue targets to the plan.
The revenue target is the total value of the opportunities you hope to win during the period.
Typically, you set a revenue target for each 12-month period in the lifetime of the plan, and another revenue target for the remaining months, if any. However, you can set periods to any length you want.
To add a plan period
If this is the first plan period, the Start date is set automatically to he start of the current month. You can adjust this if necessary.
If this is a subsequent plan period, the Start date is set to immediately after the End date of the previous period.
If you adjust the End date of the previous period, the Start date of this period adjusts automatically. This ensures that there is never a gap or overlap between plan periods.
To delete a plan period, click its trashcan icon.
The Total Plan Duration extends from the start date of the first plan period to the end date of the last plan period.
However, team members can continue to work in the plan even after the end date has passed, and long as the plan has not been made Inactive.
If you ever need to delete the account plan:
Note: This tab is available only if your Salesforce configuration grants you Delete access to the account plan. For example, if your org uses a role hierarchy, and your role is lower than that of the plan owner, you can't delete the plan. You don't see the Delete Plan page.