Step 1: Create the External Credential and Named Credential
You configure an External Credential and a Named Credential for the AI endpoint you intend to use. The Named Credential holds the LLM provider's API URL and a reference to the External Credential, which in turn holds the authorization key. Because the Named Credential is referenced by name in an Altify custom setting, you can choose its name.
Create the External Credential
- In Setup, find and select Named Credentials.
- Click the External Credentials tab.
- Click New and complete the New External Credential dialog as follows:
- Label:
[CompanyName] AIAgnostic LLM Auth - Name:
[CompanyName]_AIAgnostic_LLM_AuthNote: The above label and name are suggestions only. You are free to name the external credential as you see fit.
- Authentication Protocol: Custom
- Label:
- Click Save.
- On the External Credential record you just created, scroll down to the Principals pane and click New.
- In the Create Principal dialog, enter Default as the Parameter Name and click Save.
- In the Custom Headers pane, click New.
- In the Create Custom Header dialog, enter the following, depending on your AI provider:
Provider Name Value (API key) OpenAI AuthorizationBearer sk-…your-openai-key…Anthropic x-api-keysk-ant-…your-anthropic-key…Anthropic anthropic-version2023-06-01Perplexity AuthorizationBearer pplx-…your-perplexity-key…The API key is specific to your org and therefore needs to be configured directly in the Salesforce Setup of your org.
Note: The header value is stored encrypted at rest. The bearer token never appears in Apex — Salesforce injects it on each callout.
You can leave the Sequence Number (1) as is.
- Click Save.
- If the underlying service needs two distinct proof-of-identity values, add a second custom header. In this scenario, your external credential requires two headers to satisfy it.
Create the Named Credential
- On the Named Credentials page, with the Named Credentials tab selected, click New.
- In the New Named Credential dialog, enter the following:
- Label:
[CompanyName] AIAgnostic LLM - Name:
[CompanyName]_AIAgnostic_LLMNote: The above label and name are suggestions only. You are free to name the named credential as you see fit. Make a note of the name, as you enter it in the Altify LLM Config custom setting in Step 3: Configure the LLM Provider.
- URL: depending on your AI provider, enter the relevant value below:
AI provider URL OpenAI https://api.openai.comAnthropic https://api.anthropic.comPerplexity https://api.perplexity.aiFor any other LLM, enter the full base URL of the endpoint your Salesforce org needs to reach — either the provider's direct API URL, or your organization's internal gateway URL if requests are routed through one (for example,
https://your-gateway.yourdomain.com). - Enabled for Callouts: leave this toggle enabled.
- External Credential: select
[CompanyName] AIAgnostic LLM Auth(the external credential you just created). - In the Callout Options section, ensure that the following options are enabled:
- Generate Authorization Header
- Allow Formulas in HTTP Header
- In the Managed Package Access section, enter ALTF in Allowed Namespaces for Callouts - as shown below.
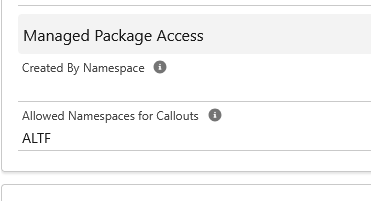
Note: Without the ALTF namespace, Altify cannot make callouts using the named credential, and the HTTP test in Step 6: Verify the Connection returns an error.
- Label:
- Click Save.
The named credential is now displayed in the Related Named Credentials pane of the external credential you created.