Opportunity Insights Access for Partner Users
If you have Salesforce partner users, you can set up their access to specific Opportunity
Note: You must complete the steps outlined in this topic to configure access for partner users. Once you have the steps completed and a partner portal created as per the Salesforce guidance, you can grant access to specific opportunity
The following steps are required to grant access to Opportunity
When the above steps are completed, you can Assign opportunity access to specific partner users.
Note: For more in-depth guidance on Salesforce portals, see their online publication Create and Manage Partner Portals.
Consult our Troubleshooting section for potential resolutions to partner portal access issues.
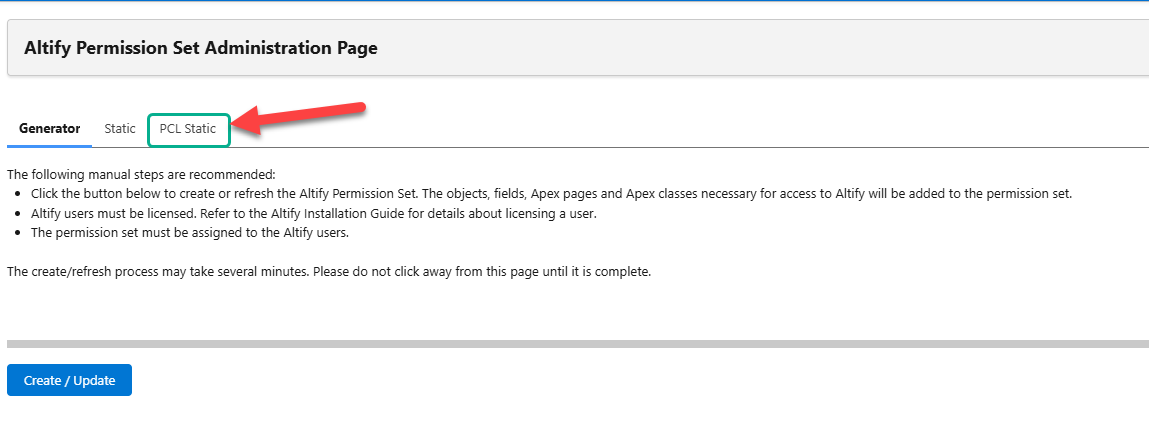
Generate the permission set for partner users
-
Select Altify Permission Set Administration in the App Launcher menu.
-
On the Altify Permission Set Administration Page, select the tab PCL Static (indicated below).
-
On the Altify PCL Permission Set Administration Page, enable/disable the optional settings (Click here if you are in a production environment and Click here if you wish to run specific tests) as appropriate and then click Generate Permission Set.
Update the sharing settings for Altify objects
To facilitate access to account plans, you need to update the Sharing Settings of a number of custom objects - as described below.
-
In Setup, find and select Sharing Settings.
-
On the Sharing Settings page, click Edit.
-
Set the Default External Access of the following objects to 'Public Read Only':
-
Altify Assessment Question
-
Altify Object Relationship
-
Altify Quicklink
-
Altify Relationships Filter
-
Altify Sales Process
-
Altify Sales Process Qualifier
-
Altify Solution
-
User
-
-
Under User Visibility Settings, enable the following:
-
Portal User Visibility
-
Site User Visibility
-
-
Click Save.
Now it is time to enable the portal - as described in the Salesforce trailhead 'Create a Partner Portal, Enable Partner Account and Users, and Add Members'.
Note: As mentioned in the trailhead, you must have a role before you can enable partner users.
Configure portal membership
When adding profiles to your portal's membership, as described in the Salesforce trailhead, ensure that you add the following:
-
Selected Profiles:
-
'Partner Community User'
-
'Customer Community User'
-
-
Selected Permission Sets:
-
'Altify PCL Permission Set'
-
Assign permission set and licenses to enabled partner users
When you are creating partner users as described in the Salesforce documentation, you need to ensure that each partner user is assigned the 'Altify ACL Permission Set'.
You must also assign the following licenses to partner users:
-
Altify
-
Altify
To assign a license go to Setup → Installed Packages and select Manage Licenses for the relevant package.
Add the Altify Insights launchpad to your portal site
-
In Setup, find and select All Sites and click Builder for the partner portal site.
-
In Preview mode (located in the upper right-hand corner), navigate to the Opportunities page in your portal site and click on a listed Opportunity record.
-
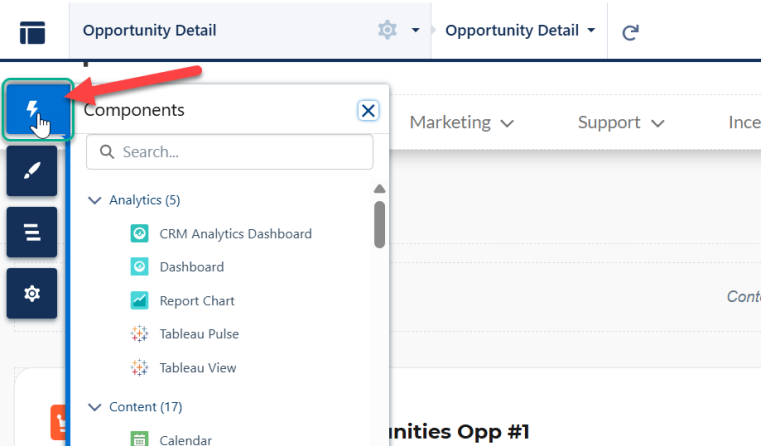
On the Opportunity Detail tab, click Back to Builder (located in the upper right-hand corner).
-
Click the Components icon in the upper left-hand corner - as shown below.
-
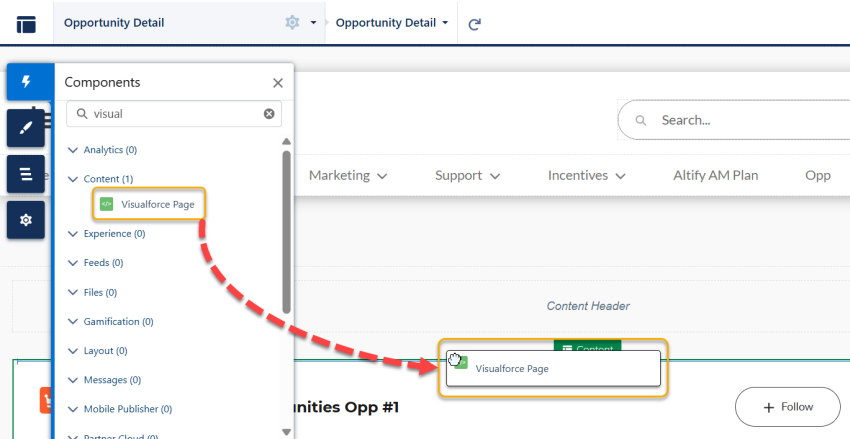
Find the Visualforce Page component and then drag and drop it to a suitable location on the page (this is where the Altify Insights launchpad will be displayed).
-
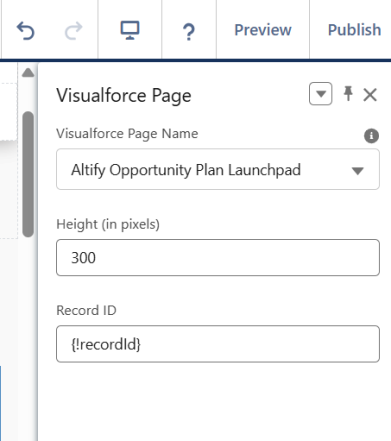
In the side panel Visualforce Page, enter the following values (as shown in the example below):
- Visualforce Page Name: 'Altify Opportunity Plan Launchpad'
-
Height (in pixels): '300'
-
Preview and Publish your page.
Enable assignment of actions to partner users
Partner portal users need to be visible for actions to be assigned to them and for them to assign actions to each other. To ensure their visibility you need to do the following: Enable a custom setting and Update site preferences.
Enable a custom setting
A custom setting is available that enables the assignment of Opportunity (and Account) actions to your partner users.
- In Setup, go to Custom Settings.
- Click Manage beside Altify Core Settings.
- Click Edit.
- Select the Include Partner License Users check box.
- Click Save.
Update site preferences
-
In the My Workspaces menu, select Administration - as shown in the example below.
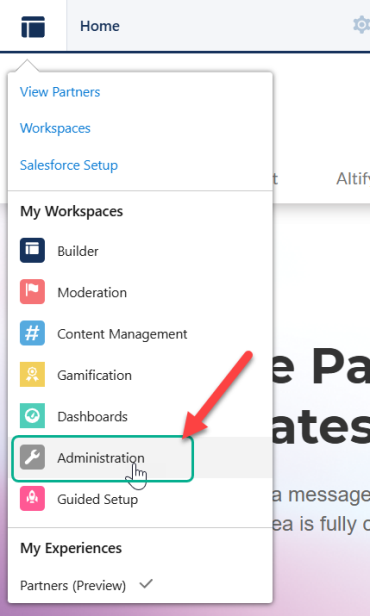
-
On the Administration page, select Preferences in the side panel menu.
-
In the Preferences pane, enable the following custom settings:
-
See other members of this site
-
Let guest users see other members of this site
-
Assign opportunity access to specific partner users
Once configuration of Altify and your published partner portal is completed, you can assign opportunity access to the relevant partner users (specifying read or read/write access).
-
On the Opportunity record, access the Sharing function.
-
In the Share dialog, change the search filter by clicking the icon and selecting Partner User.
-
Find and select the relevant partner user who requires access to the opportunity plan.
-
Select the required level of Opportunity Access.
-
Click Save.
For more on record sharing in Salesforce, see Sharing and Record Access Features and Things to Know About Sharing Opportunities in Salesforce Help.
Troubleshooting
The following configurations may help with portal access issues:
Enable Lightning web components
-
In Setup, find and select Settings in the Digital Experiences section.
-
Enable the following setting: Use Lightning web components on your record pages in Aura sites
-
Click Save.
Activate the root URL
-
In Setup, find and select All Sites in the Digital Experiences section.
In the example pictured below, you will see the root URL is highlighted (the URLs of the other sites listed are an extension of this root URL).
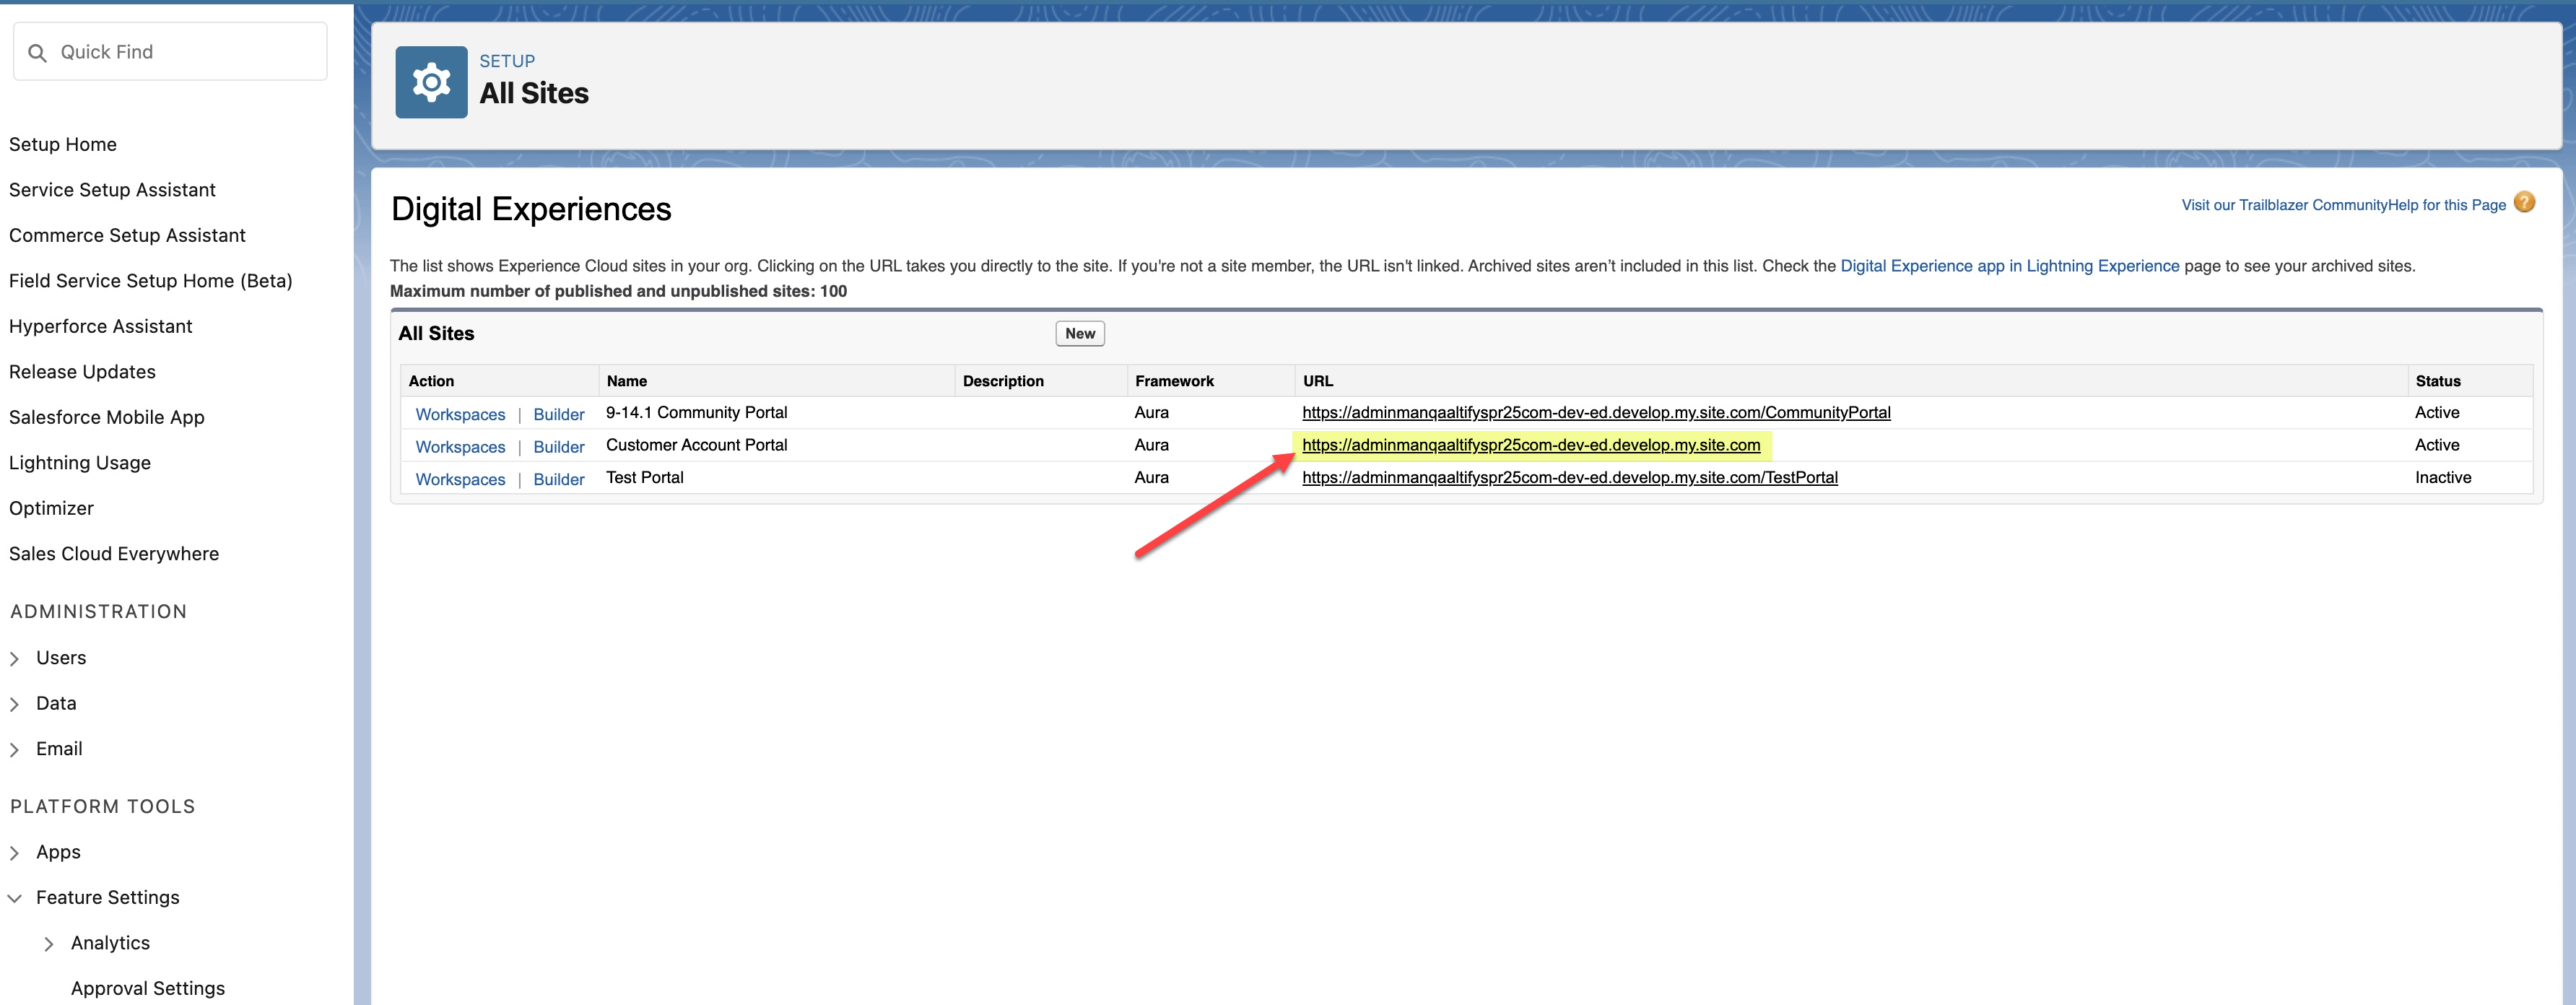
-
Set the Status of the root URL site to 'Active' as shown in the above example.
If this site is inactive, the other sites (including a community portal) will not work.
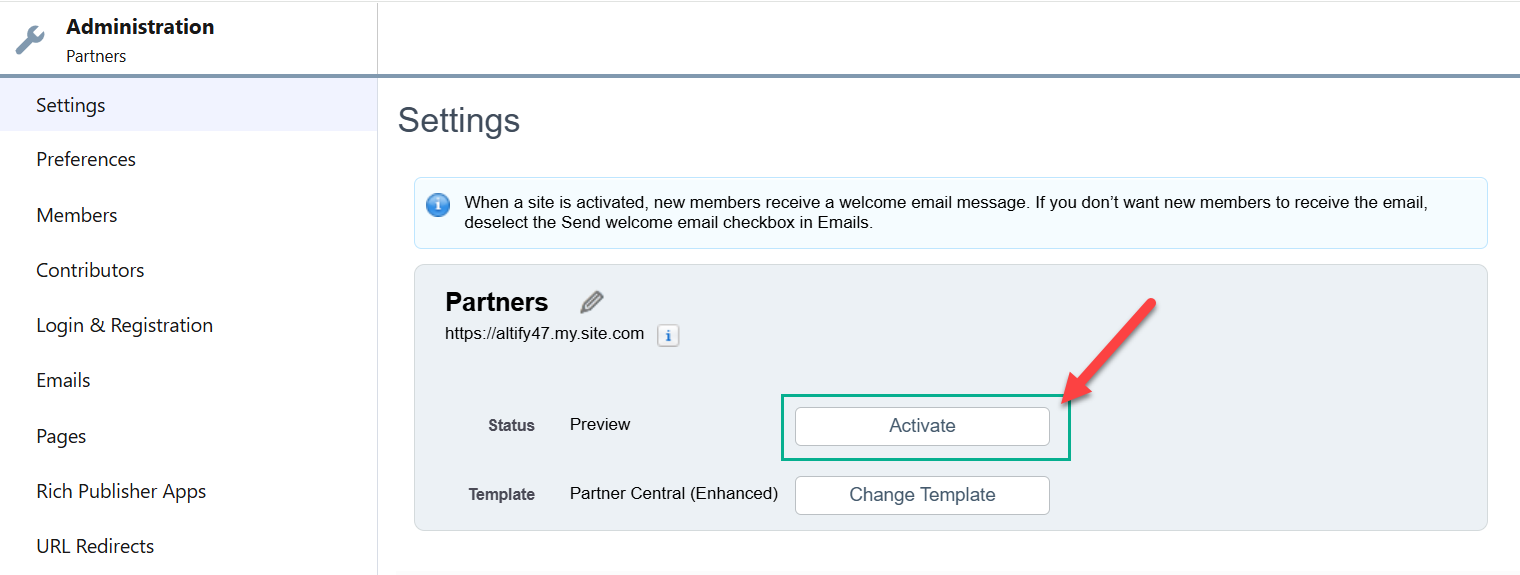
To activate the URL, do the following:
-
Click on Workspaces for the relevant site.
-
Under My Workspaces, select the Administration pane.
-
Click Activate for the partner site - as indicated in the example below.
-