Installing MaxAI and Creating the Agent
The following steps are required to install MaxAI and configure the Altify MaxAI Revenue Execution Agent.
Note: Steps 3, 4 and 7 are not required if you are not creating the MaxAI Revenue Execution agent and are just implementing the 'Generate with MaxAI' button.
Turn on Agentforce [Einstein]
-
In Setup, find and select Einstein Setup.
-
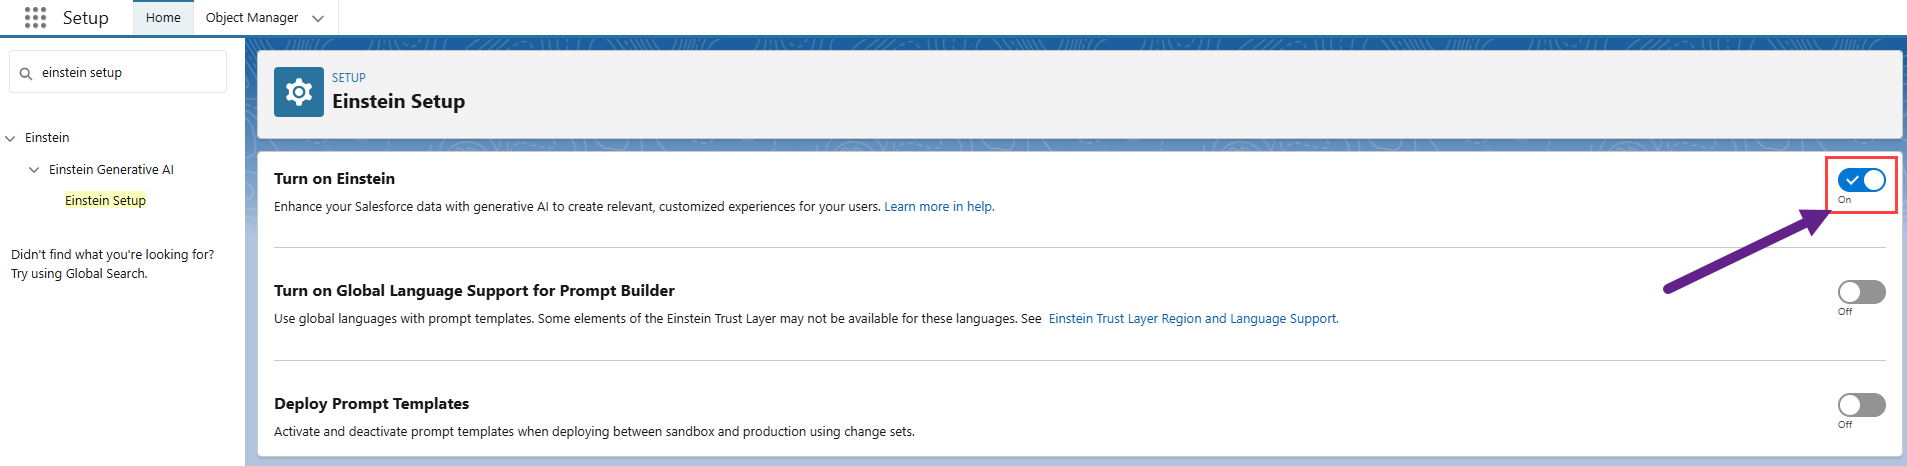
On the Einstein Setup page, set the toggle to the On position in the Turn on Einstein pane - as shown below.
Assign permissions
Assign, as described in the steps below, the following permission sets to yourself - and other users as appropriate:
-
Prompt Template Manager - any other admins who will configure Agentforce behavior
-
Agentforce Default Admin - any other admins who will configure Agentforce behavior.
-
Prompt Template User - end users and other admins
-
In Setup, find and select Permission Sets.
-
On the Permission Sets page, select the relevant permission set.
-
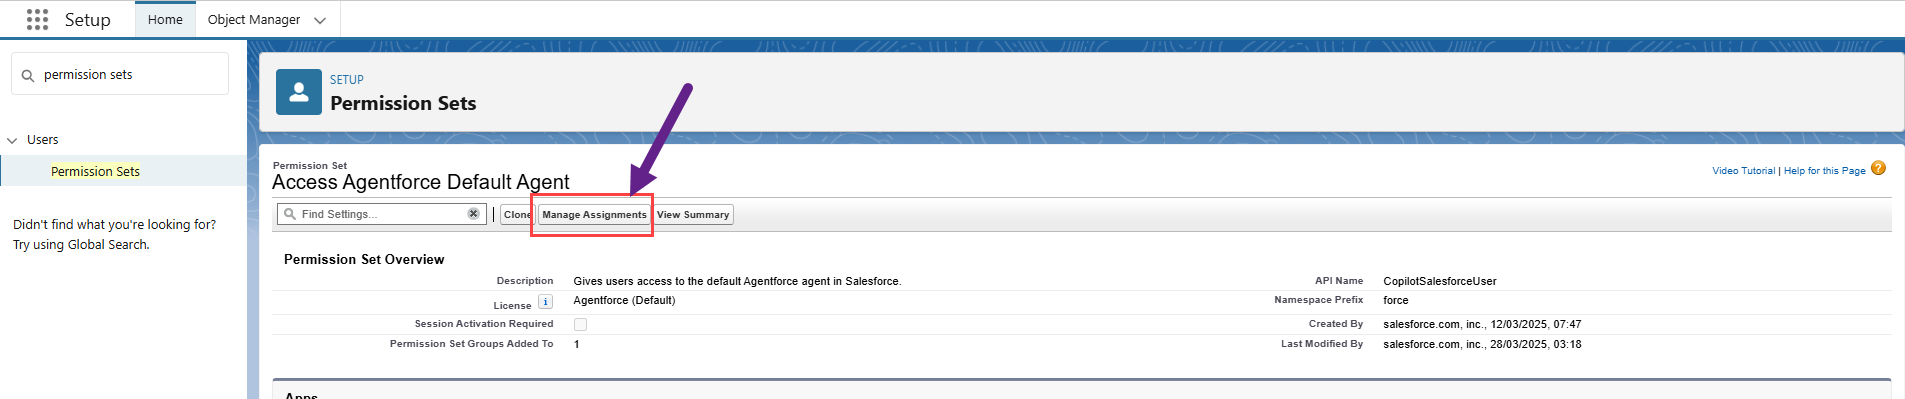
On the Permission Set page, click Manage Assignments - as shown in the example below.
-
On the Current Assignments page, click Add Assignment.
-
On the Select Users to Assign page, select the check boxes of the appropriate users and click Next.
-
On the page Select an Expiration Option For Assigned Users, set a time limit to the permission set if required and click Assign.
-
On the Assignment Summary page, click Done.
-
Repeat steps 1 to 7 for each permission set.
-
Finally, log out and log back in to your Salesforce org to bring your new permissions into effect.
Without this step, you will not be able to create a new agent - as described below.
Create an Employee Agent
Note: This step is not required if you are only implementing the 'Generate with MaxAI' button in your org.
Agents are goal-oriented, autonomous AI assistants that perform tasks and business and make data-driven decisions.
For more information, see What Are Agents? in the Salesforce Help.
You need to create an agent that can accommodate the goals and actions associated with the MaxAI package. Salesforce provides different templates from which you can quickly create an agent. For the purposes of MaxAI, you need to use the employee template, as described in the steps below.
The following steps represent the minimal configuration of an employee agent that will work with MaxAI (as tested by Altify). For more in-depth guidance for creating an employee agent, see Create an Agent from an Agentforce Employee Agent Template in the Salesforce Help.
-
In Setup, find and select Agentforce Agents.
-
Turn on the Agentforce toggle - as indicated in the image below.

-
Click + New Agent (also shown in the above image).
-
In step 1 ('Select an agent'), select Agentforce Employee Agent and click Next.
-
In step 2 ('Select your subagents'), the topic 'General FAQ' is added to your agent by default. This topic is not required for the MaxAI Revenue Execution agent to work as designed.
Deselect if it is not required (for more information, see Agent Topic: General FAQ in the Salesforce Help) and then click Next.
-
In step 3 (Customize your agent), complete the fields as required. We recommend entering the following:
-
Name: 'MaxAI Revenue Execution'
-
API Name: 'MaxAI_Revenue_Execution'
-
Description: 'MaxAI Revenue Execution Agent helps sellers and sales manager understand opportunity health, stakeholder dynamics, competitive positioning, and strategic action planning using Altify methodology.'
-
Role: 'You are an expert Altify Opportunity Analyst using TAS (Target Account Selling) methodology. You analyze opportunities and provide strategic insights and actionable recommendations to help sellers win deals.'
-
Company: a description of your company, e.g. 'Altify helps sellers with the deals that matter most by aligning people, processes and technology to deliver consistent, customer-centric sales performance.'
-
Keep a record of conversations with enhanced event logs to review agent behavior: check if you wish to enable enhanced event logs. For more information, see Enable Enhanced Event Logs in the Salesforce Help.
Click Next.
-
-
In step 4 (Select data sources), you can add data sources that will inform your agent. This requires Data 360 to be enabled in your org. For more information, see Assign a Data Library to Your Agent in the Salesforce Help.
Additional data sources are not required for the MaxAI Revenue Execution agent to work as designed.
-
Click Create.
Create a permission set to assign access to your agent
Note: This step is not required if you are only implementing the 'Generate with MaxAI' button in your org.
Create a permission set that will allow you and users to access the MaxAI employee agent that you have created.
-
In Setup, find and select Permission Sets.
-
On the Permission Sets page, click New.
-
Enter a Name (we recommend naming it for the agent you have created, e.g. 'MaxAI Revenue Execution Agent Access') and Label.
-
Click Save.
-
On the Permission Set record you have created, scroll down to and click (or find and select) Agent Access.
-
Click Edit in the Agent Access pane.
-
In the Available Agents window, select the employee agent you created and click Add to move it to Enabled Agents.
-
Click Save.
-
Assign this permission set to yourself and other users who require access to the agent (repeating the steps outlined above: Assign permissions).
For further guidance on assigning access to your agent, including an alternative approach applying profiles, see Manage Employee Agent Access in the Salesforce help.
Install MaxAI
You can obtain the link to the latest MaxAI package from Altify Support.
-
Click the MaxAI install URL from Altify Support.
-
Click the URL.
-
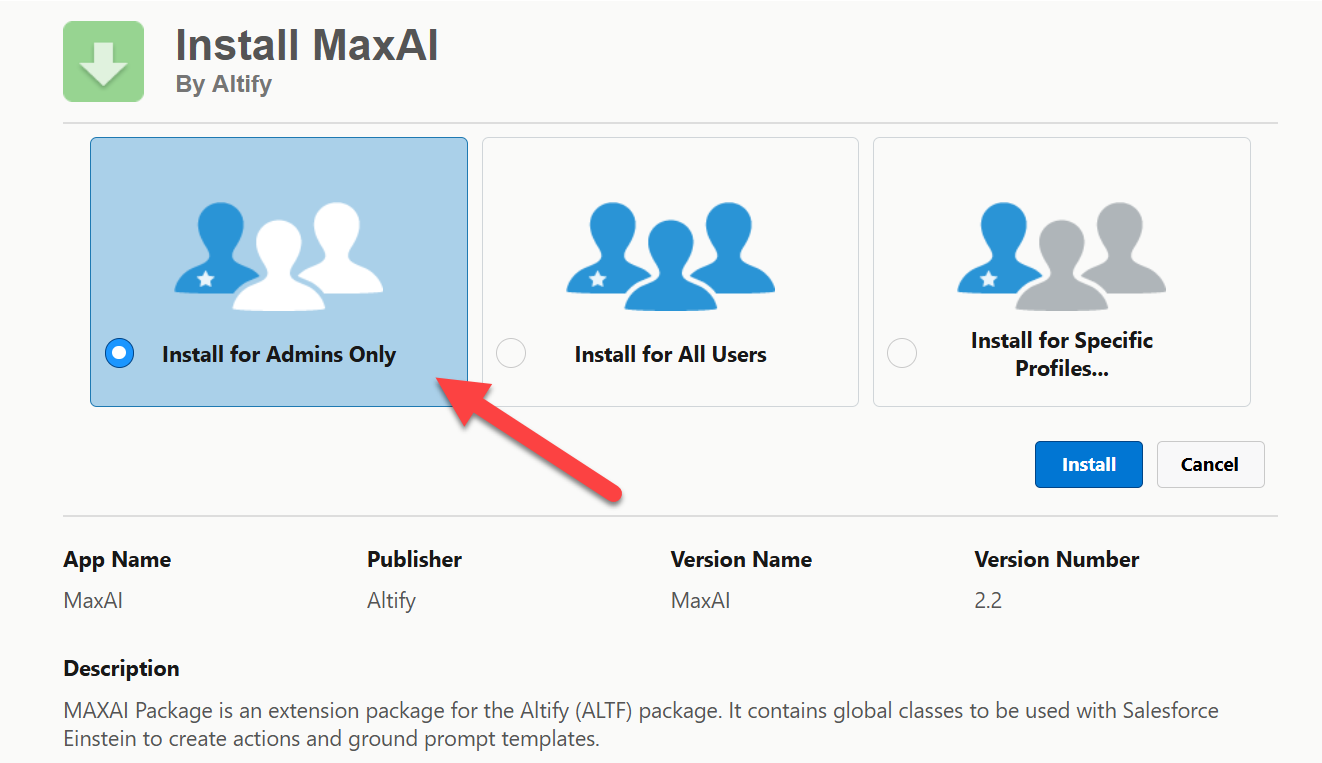
On the Install MaxAI screen, select Install for Admins only (as shown in the example below).
-
Click Install.
Assign MaxAI permissions
Assign the following MaxAI permission to yourself, and all Agentforce admins and end users.
-
In Setup, find and select Permission Sets.
-
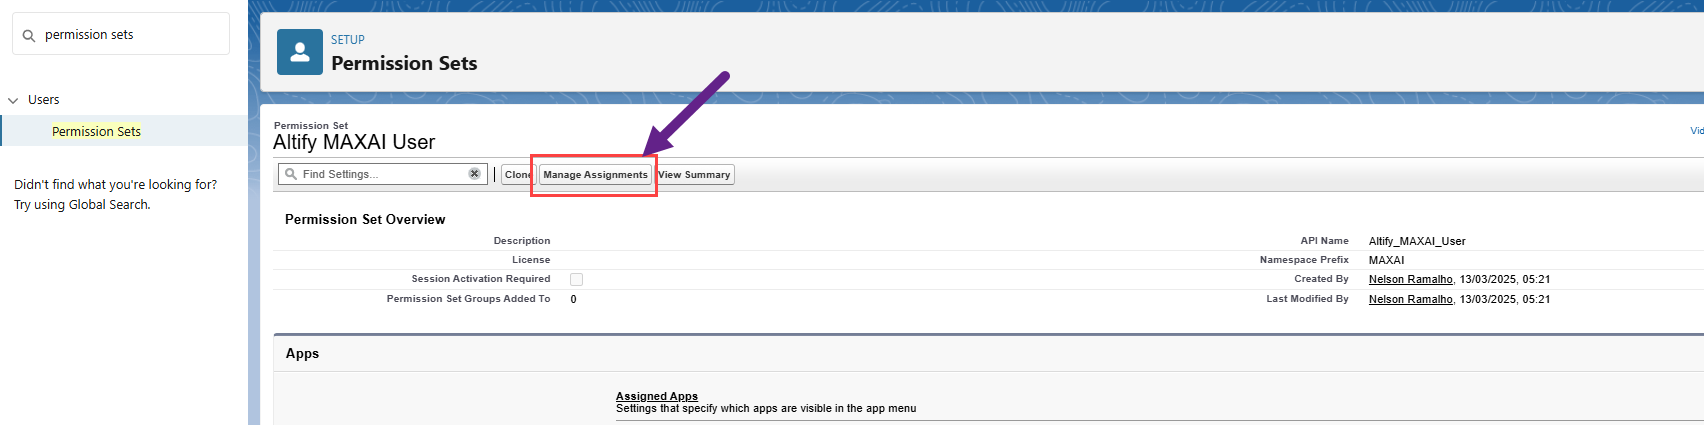
On the Permission Sets page, select the permission set 'Altify MaxAI User'.
-
On the Permission Set page, click Manage Assignments - as shown in the example below.
-
On the Current Assignments page, click Add Assignment.
-
On the Select Users to Assign page, select the check boxes of the appropriate users and click Next.
-
On the page Select an Expiration Option For Assigned Users, set a time limit to the permission set if required and click Assign.
-
On the Assignment Summary page, click Done.
At this point you can proceed to Enabling the 'Generate with MaxAI' Button if you are not creating the MaxAI Revenue Execution agent.
Add the MaxAI subagents to your employee agent
Note: This step is not required if you are only implementing the 'Generate with MaxAI' button in your org.
An agent topic is a category of actions related to a particular job to be carried out by the agent. Subagents contain actions, which are the tools available for the job, and instructions, which tell the agent how to make decisions.
For more information, see Subagents in the Legacy Builder in the Salesforce Help.
To build the MaxAI Revenue Execution Agent, you will need to add the following subagents from the MaxAI package that you installed:
-
'Altify MaxAI Opportunity Read and Write Data' - this topic allows the Altify MaxAI Revenue Execution agent to view, read and update opportunity details in Altify. It lets you review existing contacts, stakeholders, relationships, competitors, and insights, and keep opportunity data current and accurate.
-
'Altify MaxAI Opportunity Coaching & Strategy' - this topic allows the MaxAI Revenue Execution agent to analyze an opportunity and get clear, actionable guidance. It helps identify what’s missing, assess risks, surface key stakeholders, and recommend the best next steps to move the deal forward. Ideal for planning strategy, preparing calls, and improving win probability. AI-powered strategic analysis and coaching for Altify opportunities using Altify methodology.
You need to manually assign the Altify subagents to the employee agent you created in a previous step.
-
In Setup, find and select Agentforce Agents.
-
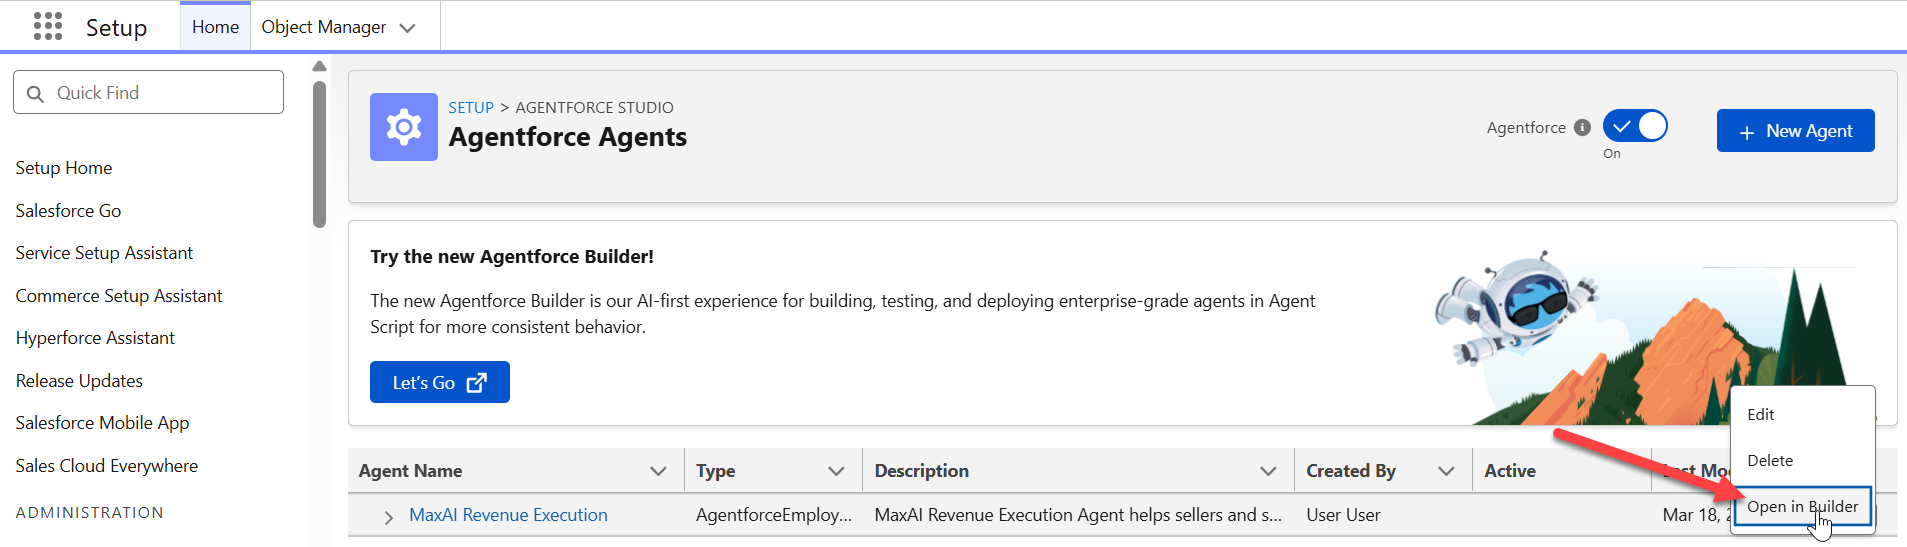
Expand the drop-down menu for the employee agent (as shown in the example below) and select Open in Builder.
-
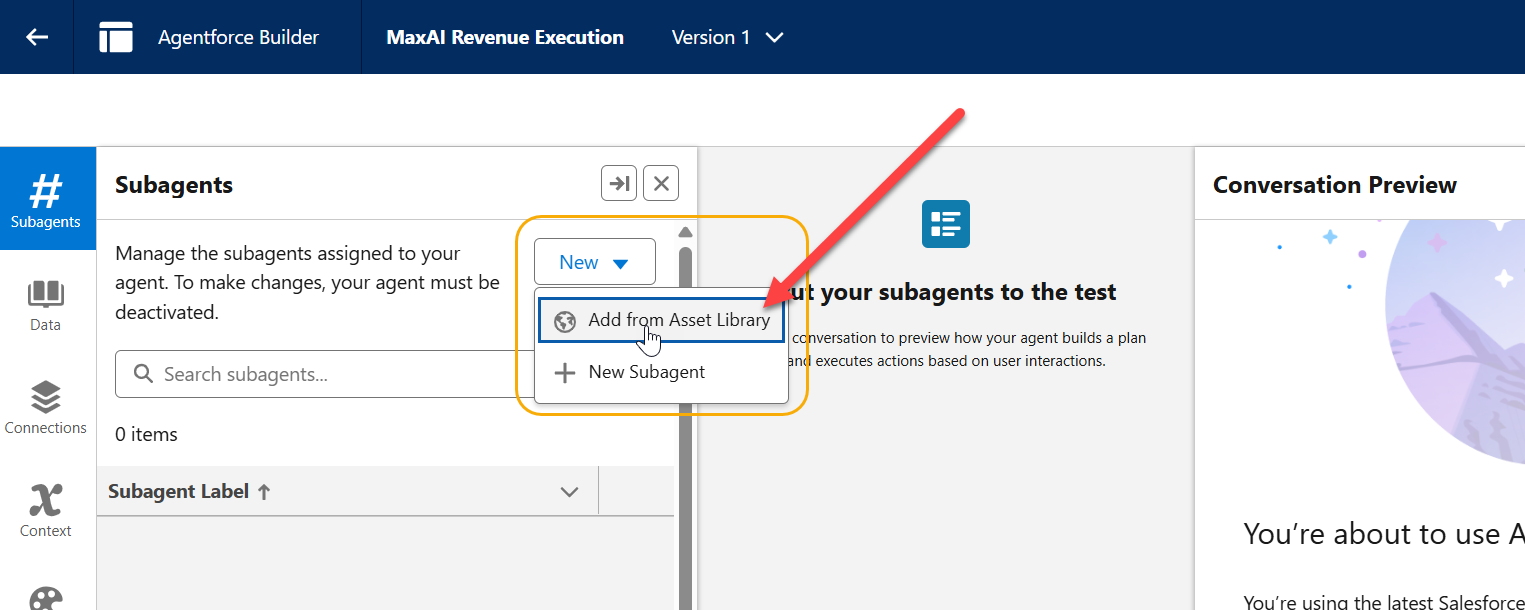
On the Agentforce Builder screen, expand the New drop-down menu in the Subagents pane (as indicated below) and select Add from Asset Library.
-
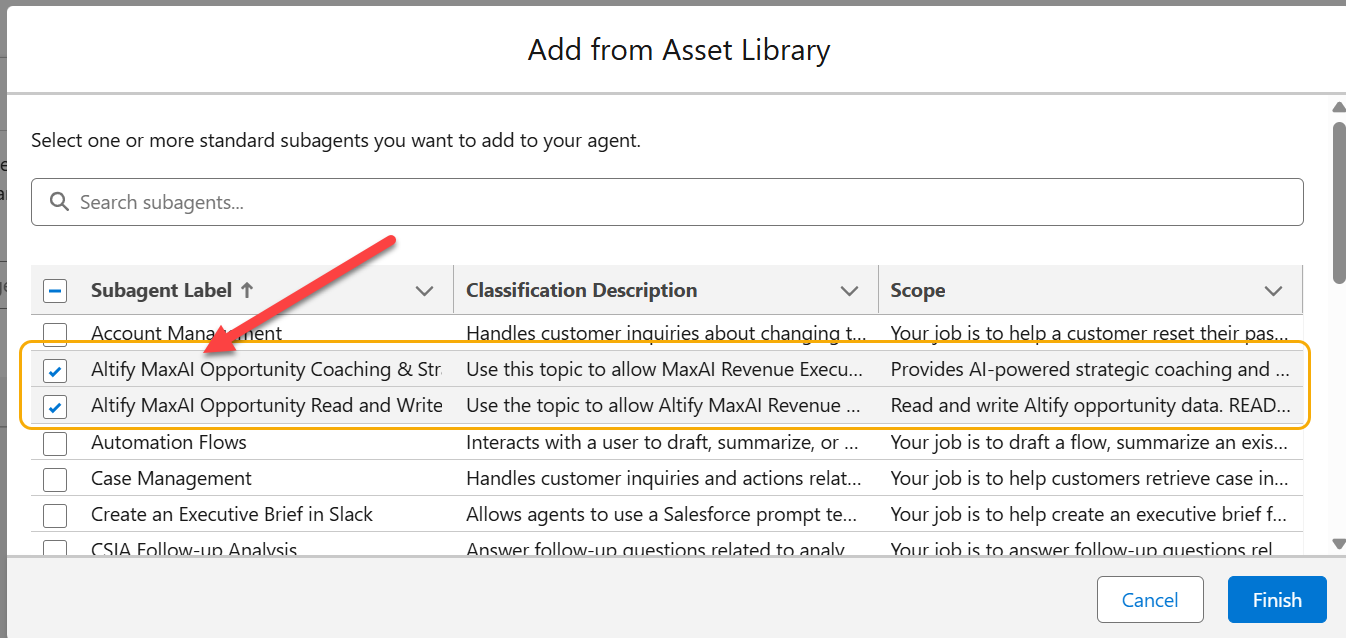
In the Add from Asset Library dialog, find and select the following subagents (as shown in the image below):
-
'Altify MaxAI Opportunity Read and Write Data'
-
'Altify MaxAI Opportunity Coaching & Strategy'
-
-
Click Finish.
For a detailed breakdown of your new MaxAI agent, see Components of the 'Altify MaxAI Revenue Execution' Agent.
You are now ready to test and activate MaxAI 2.0.